Digital Productivity, Online planners, Planners
Day Designer Weekly Monthly Planner: Complete Guide
Mar
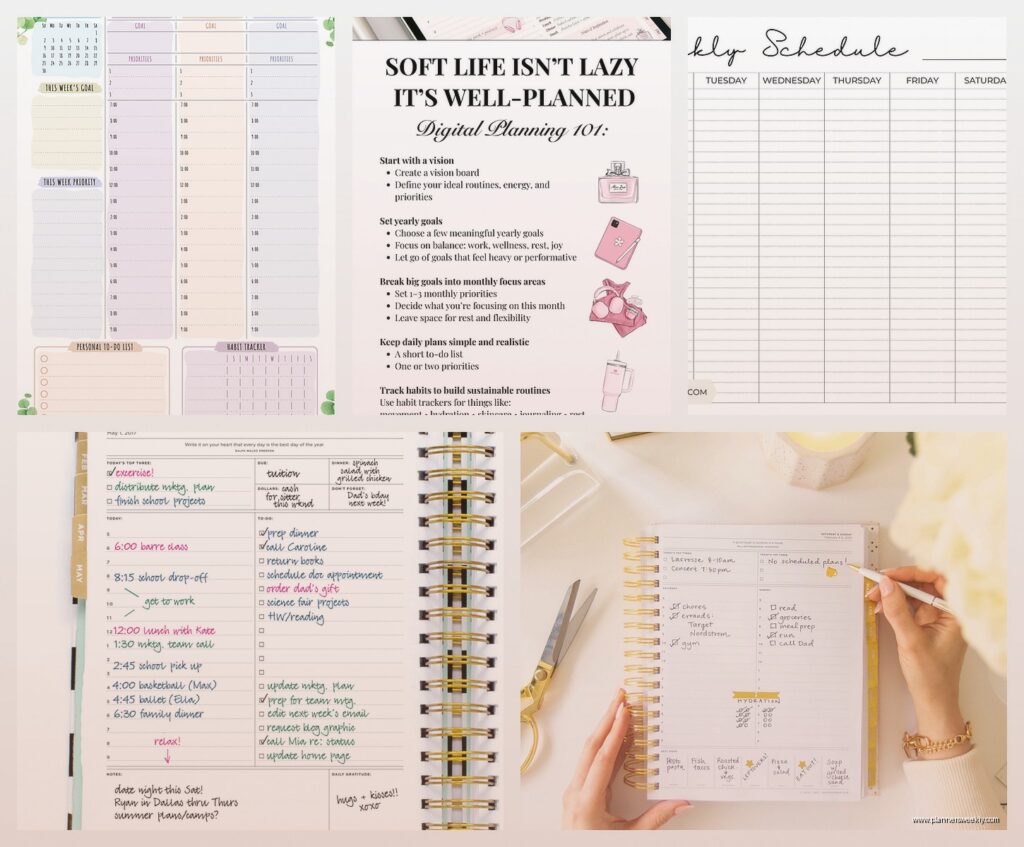
Okay so I’ve been using Day Designer planners for like three years now and here’s what nobody tells you when you’re standing in Target staring at the display trying to figure out which one to grab.
The actual difference between their layouts
First thing – Day Designer makes basically three main types and they’re NOT interchangeable even though they look similar in photos. There’s the daily, the weekly, and the monthly. The daily is honestly overkill unless you’re scheduling back-to-back meetings all day. I tried it for two months and ended up with like 75% blank pages because who actually has that much stuff happening on a Tuesday in February, you know?
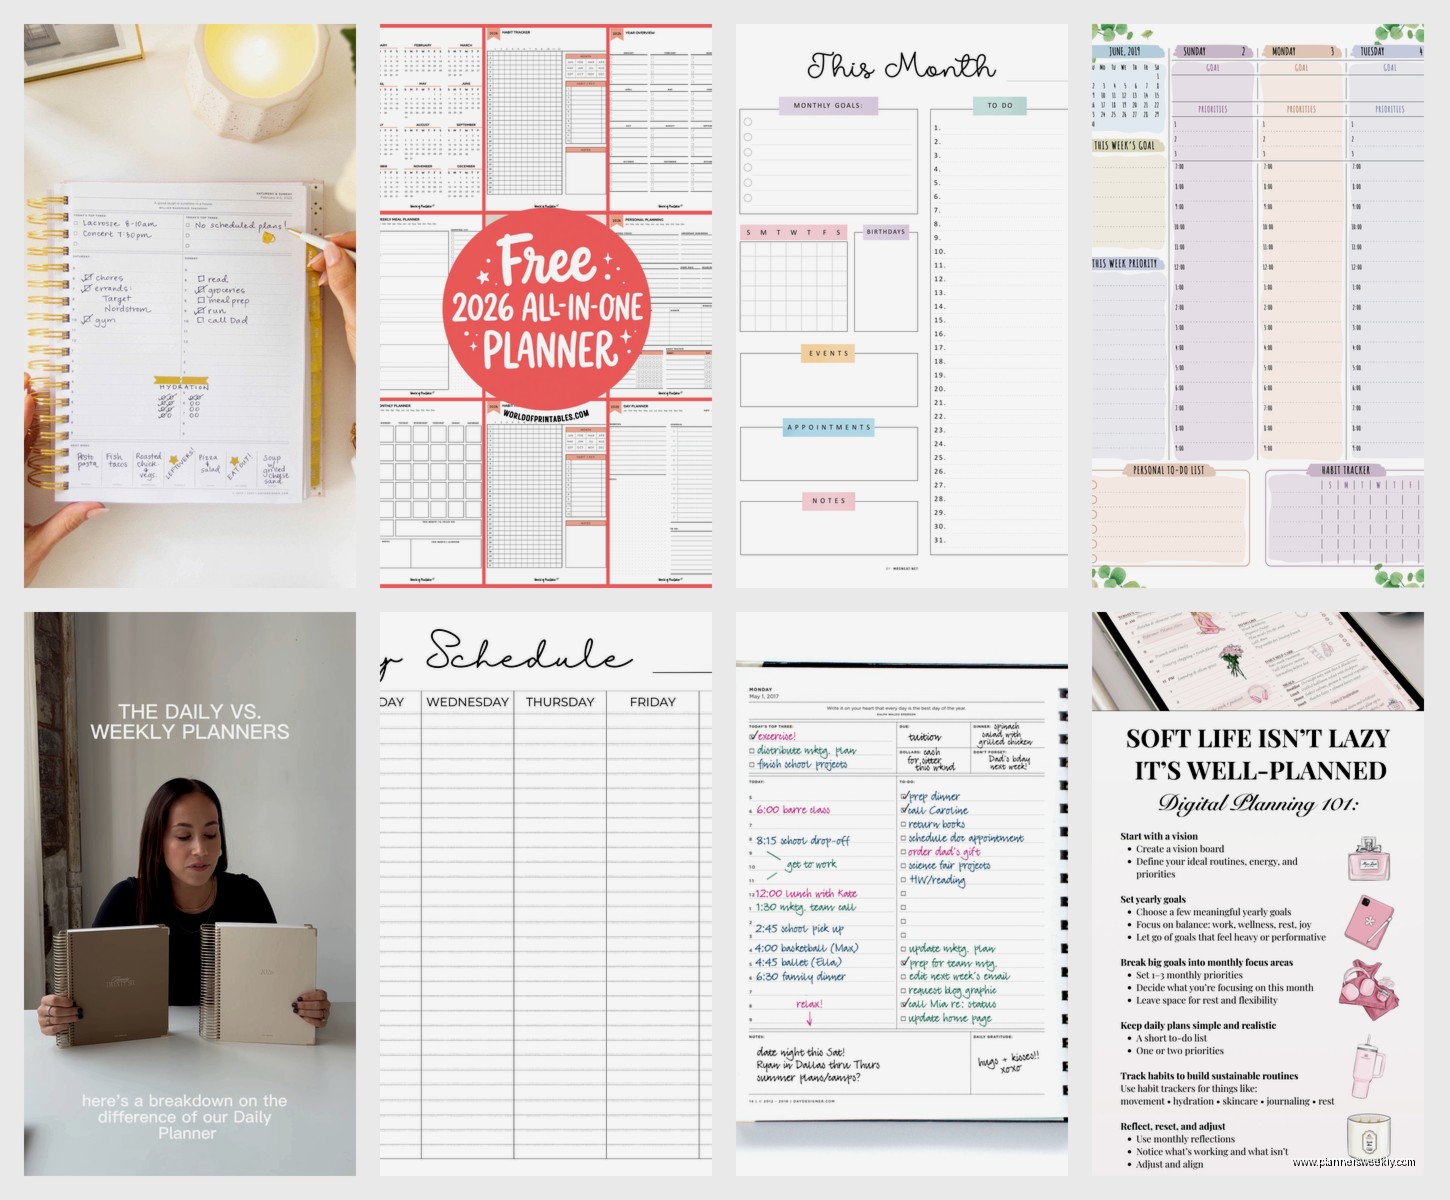
The weekly is where it’s at for most people. You get a full week spread with hourly scheduling from 6am to 8pm, which sounds limiting but here’s the thing – if you’re doing stuff after 8pm that needs to be scheduled, you can just write it in the margin or honestly it’s probably personal stuff that doesn’t need the same level of detail anyway.
Weekly layout deep dive because this is probably what you want
So the weekly has this column on the left for each day with time slots, and then a notes section on the right side of the spread. Some versions have the notes on the left, depends which year and edition you get. I actually prefer notes on the right because I’m right-handed and don’t smudge everything, but if you’re a leftie this might bug you.
Each day gets broken into those hourly chunks and there’s also a top section for your daily focus or top three tasks. I ignored this for like six months and then my productivity coach friend (yeah I know, ironic) pointed out I was basically wasting prime real estate and once I started actually using it my whole planning system got better.
The monthly view sits at the front of each month and it’s pretty standard – just boxes for each day. Nothing fancy. You get a little notes section at the bottom which I use for tracking subscription renewals because I kept forgetting when Spotify charged and it was messing up my budget tracking.
Size options and why it actually matters
They make these in like four sizes and this is where people mess up. The big one – I think it’s called the flagship or original size – is 8.5 x 11 inches. It’s HUGE. I mean great if you work at a desk all day but I was carrying this thing to coffee shops and client meetings and it barely fit in my work bag. My dog knocked it off the counter once and pages went everywhere, whole thing bent.
The mid-size is like 7 x 9 inches maybe? That’s my sweet spot. Fits in most bags, still enough room to actually write stuff without cramming letters together like you’re back in college trying to fit study notes on a cheat sheet.
They also make a mini which is cute but functionally useless if you have actual appointments to track. The boxes are so small you’re abbreviating everything and then three weeks later you’re looking at “Dr appt 2pm” with zero context about which doctor or why.
Binding situation
Most Day Designers come in coil binding which I actually love? I know some people hate coils but you can fold it completely back and it lays flat and you can rip pages out cleanly if you need to. The hardcover ones with coil are sturdy enough that you can write on them standing up, like if you’re checking your schedule while waiting in line somewhere.
Some of the fancier editions have that layflat binding instead – no coil, just glued in a way that lets it open flat. These look more professional in meetings but they’re harder to fold back if you’re tight on desk space. Also way more expensive, like $15-20 more for basically the same internal pages.
The goal-setting pages everyone ignores
Okay so funny story – every Day Designer has like 10-15 pages at the beginning for goal setting and vision planning and monthly reviews. I skipped these entirely my first year because they felt very… I dunno, self-helpy? But then I had a client cancel on me one morning and I was bored so I actually filled them out and OH MY GOD it’s actually helpful.
There’s this section where you write your top goals for the year and then it makes you break them down by quarter and then by month. Sounds basic but seeing “write book proposal” vs “research 3 literary agents by Feb 15, draft chapter outline by Feb 28” is like… actually actionable, you know?
The monthly reflection pages ask you stuff like what worked, what didn’t, what you’re grateful for. I skip the gratitude part mostly because it feels forced but the “what didn’t work” section has saved me from repeating the same scheduling mistakes over and over.
Wait I forgot to mention the expense tracker
Some versions have expense tracking pages in the back. I never use these because I track everything digitally but if you’re trying to be more mindful about spending without using an app, they’re there. Just basic columns for date, item, amount, category.
Cover options and durability testing
The covers range from basic laminated paper (which honestly gets beat up fast if you’re tossing it in bags) to the hardcover versions with designs. I’ve had floral ones, marble ones, the navy blue flagship one that everyone seems to have.
The laminated covers start peeling at the corners after like 3-4 months of heavy use. Not a dealbreaker but it looks shabby. The hardcovers hold up way better – I’m still using one from 2023 as a reference planner and except for some coffee stains it’s fine.
They also make these fabric-covered ones occasionally that are gorgeous but the fabric gets dirty SO fast. I had a blush pink one that looked dingy within weeks just from normal handling.
Sticker compatibility because apparently this matters
If you’re into planner stickers – and like half the people who use Day Designers are super into decorating them – the paper quality matters. The weekly pages have this slightly glossy finish that stickers stick to great. I don’t really decorate mine much beyond using sticky notes for priority tasks, but I tested this because so many people ask.
Washi tape works fine on the pages. Highlighters can bleed through depending on the brand – Mildliners are okay, but those thick Sharpie highlighters will definitely show through to the other side. Gel pens are perfect, ballpoint is fine, fountain pens will bleed unless you’re using really dry ink.
Comparing it to alternatives real quick
People always ask how it compares to Erin Condren or Passion Planner. Erin Condren is more customizable but also like twice the price and takes weeks to ship. The layouts are similar but EC has more color coding options if that’s your thing.
Passion Planner has more goal-setting infrastructure built into every week, which is either great or overwhelming depending on your personality. I find it a bit much – like I don’t need to reflect on my passion roadmap every single Sunday, sometimes I just need to know when my dentist appointment is.
The Happy Planner system is cheaper and has fun designs but the disc-bound system is annoying. Pages fall out, the discs catch on stuff in your bag, it’s a whole thing.
Actually using the weekly spreads effectively
Okay so here’s what actually works after three years of testing different methods. I time-block my mornings in 30-minute chunks because that’s when I’m most productive. Afternoons I just list tasks in the time slots without being as strict because honestly after 2pm my focus is shot anyway.
The daily focus section at the top – I write my ONE most important task there. Not three tasks, not five, just one. Everything else is secondary. This has changed my entire productivity game because it forces prioritization.
I use the notes column for tracking random stuff – expenses that I need to remember for tax time, ideas for blog posts, things people mentioned in conversation that I wanna follow up on. It’s basically a catch-all brain dump space.
Color coding without going overboard
I use three highlighter colors max. Yellow for work appointments, green for personal stuff, pink for deadlines. That’s it. I tried doing like seven different colors and it just looked chaotic and I couldn’t remember what purple meant versus blue versus whatever.
Some people draw little icons instead – stars for priorities, circles for calls, squares for emails. That’s too much maintenance for me but if you’re visual it might work.
The monthly spread strategy
I fill in the monthly calendar first at the beginning of each month with anything that’s already scheduled – recurring appointments, deadlines, birthdays. Then I check it every Monday when I’m planning my week to see what’s coming up.
The monthly view is honestly more useful for the big picture than daily planning. Like you can see at a glance that you have three major deadlines in one week and maybe you should move something if possible.
I also draw a little line through each day as it passes which sounds obsessive but it’s actually satisfying and helps me see how fast time is moving. Sounds weird but try it.
Which specific version to actually buy
If you’re gonna get one, get the 2025 Flagship Edition in the mid-size with coil binding and a hardcover. It’s like $35-40 depending on where you buy it. Target usually has them, Amazon obviously, and Day Designer’s website but shipping takes forever.
The academic year versions (July-June) are great if you work in education or have kids in school, otherwise stick with the calendar year. Starting a planner in July when it’s not aligned with your actual life rhythm is confusing.
Don’t get the daily version unless you legitimately have 8+ scheduled things per day. Don’t get the mini unless you’re just using it for very basic appointment tracking and already have another system. Don’t get the expensive leather-bound ones for your first Day Designer because you might hate the layout and then you’re out like $80.
Breaking in your new planner
When you first get it, fill out those goal pages even if they feel silly. Seriously. Then go through and add in any standing appointments for the whole year – recurring therapy appointments, monthly team meetings, whatever. This takes like 20 minutes but saves so much time later.
Also date all the monthly spreads right away so you’re not flipping around confused about which month you’re in. I’ve accidentally scheduled things in the wrong month more times than I wanna admit because I didn’t do this.
The dashboard pages at the front have sections for contacts, passwords, important dates – I leave most of this blank because it feels insecure to have passwords written down, but the important dates section is clutch for tracking birthdays and anniversaries without relying on Facebook.
Actual problems you’ll run into
The coil snags on stuff in bags sometimes. You can get a coil cover thing but I just learned to slide it in carefully.
If you miss a week of planning, it feels overwhelming to catch up. Just skip those pages and start fresh. Don’t try to back-fill everything or you’ll give up.
The weekly spreads don’t have enough room if you have a genuinely packed schedule. I sometimes use sticky notes for overflow tasks.
There’s no built-in bookmark ribbon which is INSANE for a planner this expensive. I use a paper clip on the current week.
The paper isn’t super thick so if you press hard when writing, you can feel the indent on the back of the page. Not a huge deal but worth knowing.
You’re gonna forget to bring it places and then feel lost without it. I take a phone pic of my weekly spread each Monday as backup.