Digital Productivity, Online planners, Planners
Day Timer Binder: Complete System Guide & Reviews
Mar
Okay so I just spent the last three weeks living with different Day Timer binders and honestly? There’s way more to this than I thought when I first picked one up at Office Depot like five years ago.
The Basic System Nobody Explains Properly
The Day Timer system is actually modular which sounds obvious but here’s what that really means – you’re buying a binder shell and then filling it with specific refill pages that match your planning style. The rings matter SO much and nobody tells you this upfront. Day Timer uses a 7-ring system for most of their stuff, but they also have 3-ring versions that work with regular binders if you wanna go that route.
I tested the classic desk size (5.5 x 8.5 inches) because that’s their most popular, and honestly it’s the sweet spot. The pocket size is too cramped if you actually write things down, and the portable (3.75 x 6.75) is just… it’s trying to be both compact and functional and doesn’t quite nail either.
Ring Sizes and Why This Matters More Than You Think
The rings come in different capacities – 1 inch, 1.25 inch, 1.5 inch. I started with a 1 inch thinking I’d be minimalist about it, gonna keep things simple, and I ran out of space in like six weeks. Had to migrate everything to a 1.25 inch binder mid-quarter which was annoying as hell.
Here’s what actually fits: a 1 inch ring holds about 150-200 pages comfortably. That’s roughly two months of daily pages plus your reference sections if you’re using the two-page-per-day format. The 1.25 inch gets you closer to four months, and the 1.5 inch is basically a full six-month system but it gets heavy.
The Refill Pages – This Is Where It Gets Specific
So Day Timer has like fifteen different page formats and they don’t make it easy to figure out which one you need. I’m gonna break down the ones I actually tested because the descriptions on their website are weirdly vague.
Two Pages Per Day
This is their flagship format. Left page has your schedule broken into 15-minute increments from 8am to 6pm (you can get extended hours versions too). Right page has a priorities section, notes area, and expense tracking.
I used this for three weeks straight during a busy client period and here’s the thing – it’s actually great if you have back-to-back meetings or appointments. The 15-minute increments keep you honest about how long things take. But if your day is more project-based with big blocks of focus time, all those little lines feel excessive. I found myself just drawing big brackets around chunks of time.
The priorities section on the right page though? Chef’s kiss. It has A-B-C priority coding which sounds corporate and boring but it actually helps when you’re staring at seventeen things and don’t know what to do first.
One Page Per Day
More compact, fits your whole day on one page. Schedule runs 7am to 7pm with 30-minute intervals. There’s a small task list on the side and a notes section at the bottom.
This worked better for my actual daily rhythm. I don’t need to track every 15 minutes, and having everything on one page means I’m not flipping back and forth. The downside is less room for notes – if you’re in lots of meetings where you’re taking detailed notes, you’ll run out of space and end up adding loose pages which defeats the purpose.
Weekly Format
Okay so funny story – I initially dismissed this format because I’m a “daily planner person” but then I had a week where I was mostly doing deep work on one big project and the weekly view was actually perfect. You get the whole week spread across two pages, each day has a column, and there’s a priorities section for the week.
It’s better for high-level planning and project work. Not great if you need to schedule specific appointments throughout the day. I keep thinking I should use two systems – weekly for project planning and daily pages for detailed scheduling – but that feels like overkill? Maybe it’s not though.
Monthly Calendar Pages
These come in every refill pack basically. Standard monthly grid. Nothing fancy but they’re necessary for looking ahead. I actually use these more than I expected for blocking out vacation days and tracking recurring commitments.
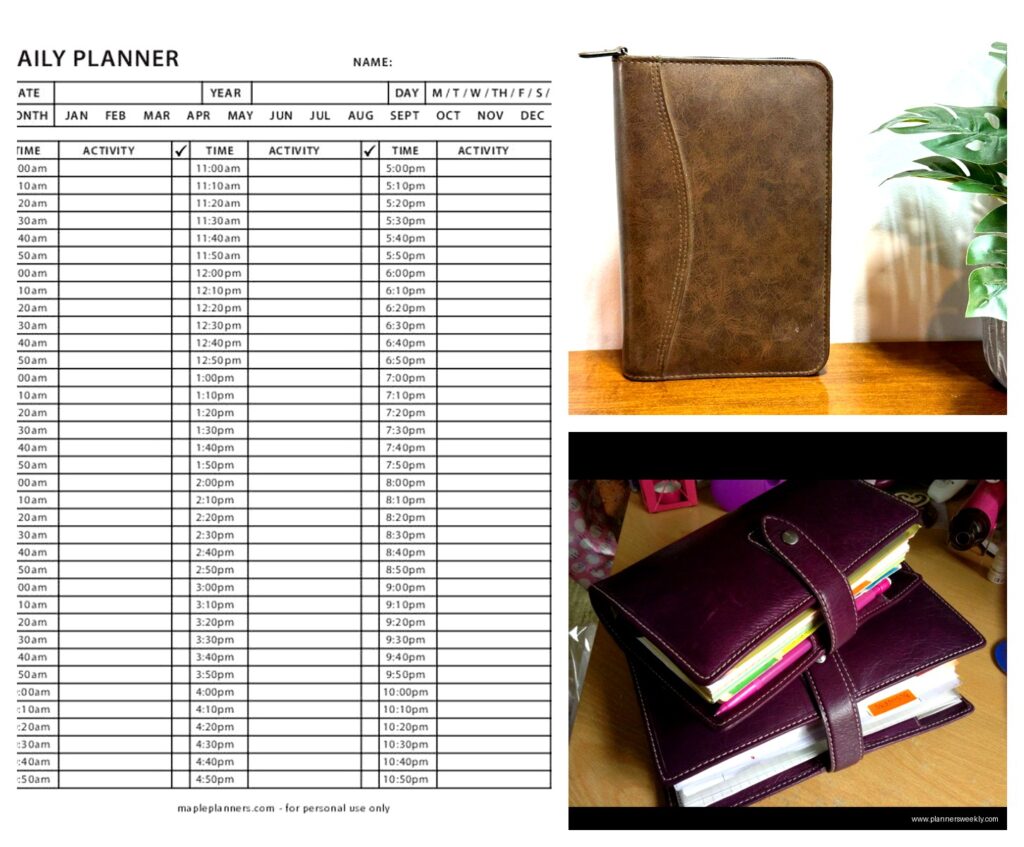
The Binders Themselves – Leather vs Vinyl vs Whatever
I tested four different binder styles because my cat knocked my coffee onto my original one and I had to replace it anyway, so might as well do a comparison right?
Classic Leather Binder
This is the one everyone thinks of – genuine leather, comes in black or burgundy usually, has that professional look. Costs around $80-120 depending on size and features.
It’s nice. It smells like leather, it feels substantial, clients are impressed when you pull it out in meetings. But here’s what nobody mentions – it’s heavy. The desk size with a full load of pages weighs like three pounds. My shoulder was sore after carrying it in my tote bag for a week. Also the leather needs occasional conditioning or it dries out and cracks. I used some leather conditioner I had for my boots and it worked fine but it’s an extra maintenance thing.
Vinyl/Simulated Leather Binders
These run $30-50 and honestly they’re pretty good? The texture isn’t as nice to touch but they’re lighter weight and they hold up fine to daily use. I’ve been using one for the past month and it still looks new. No conditioning needed, wipes clean easily.
The rings are the same quality as the leather versions – it’s really just about the cover material. Unless you’re trying to impress people or really love leather goods, I’d save the money and get vinyl.
Zip-Around Binders
These have a zipper that goes around three sides. There are pockets inside the cover for business cards, receipts, whatever. The zipper keeps everything secure which is nice if you’re throwing it in a bag with other stuff.
I thought I’d love this but the zipper actually annoyed me? It’s an extra step every time you open it, and if you’re checking your planner frequently throughout the day, that adds up. Also my zipper started sticking after a few weeks. Might’ve been a defect but it soured me on the whole concept.
The pockets ARE useful though. I was stashing post-it notes and loose receipts in there.
Open-Style Binders
No zipper, sometimes no closure at all or just a snap. These are the most convenient for quick access. Lighter weight too. But stuff can fall out if you’re not careful, and the edges of your pages get bent if it’s bouncing around in a bag.
This is what I’m using now. I keep it on my desk mostly and use a different system for mobile planning. Which maybe defeats the purpose of an all-in-one binder but whatever, it works for me.
The Accessories Situation
Day Timer sells a bunch of add-ons and some are genuinely useful while others are just… there.
Storage Pouches
These snap into the rings and give you a zippered pouch for pens, sticky notes, whatever. I use one and it’s actually great. Keeps everything together so I’m not hunting for a pen every time I need to write something down.
Get the one with a clear window if you can – being able to see what’s inside without opening it saves time.
Business Card Holders
Page inserts that hold business cards. They’re fine. I don’t collect that many business cards anymore since everyone just connects on LinkedIn, but if you’re in a field where you’re still exchanging cards at events, these keep them organized better than having them loose in a pocket.
Project Planning Pages
These are specialized inserts for tracking multi-step projects. They have sections for objectives, action steps, timelines, that sort of thing.
I wanted to love these but they felt too structured? Like the format didn’t quite match how I actually plan projects. I ended up just using blank lined pages and creating my own layout. But if you like structured templates, these might work for you.
Expense Tracking Pages
Detailed expense logs with columns for date, description, amount, category, etc. If you need to track business expenses for reimbursement or taxes, these are useful. I photograph receipts with my phone now so I don’t use these much, but my partner who’s a contractor uses them religiously.
Setting Up Your System – The Part That Takes Forever
Okay so when you first get a Day Timer binder, you gotta set it up and this takes way longer than you think. Block out like two hours if you’re gonna do it properly.
Front Section Setup
The very front should have your personal info page – name, contact, emergency contacts. Day Timer includes these templates. Fill it out even though it feels silly because if you lose your binder, you want whoever finds it to be able to return it.
Then I put my monthly calendars for the current month and next two months. Quick reference for looking ahead at deadlines and commitments.
Daily Pages Section
This is the bulk of your binder. I keep about 8-10 weeks of daily pages loaded at a time. More than that and the binder gets too fat and heavy. When I get down to two weeks remaining, I add another month’s worth of pages and move the old completed pages to an archive binder.
Some people keep completed pages in the same binder for reference but I found myself never actually looking back at them, they just added weight.
Reference Section
Back section is for ongoing reference stuff. I have:
- Project tracking pages for my three main active projects
- A goals page for quarterly goals – I rewrite this every three months
- Contact info for people I call regularly but don’t have memorized
- Random notes pages for miscellaneous stuff that doesn’t fit elsewhere
The key is not putting too much back here. It’s tempting to create elaborate reference systems but you won’t use them. Keep it minimal.
Actually Using It – The Reality Check
Here’s where I’m gonna be honest – the Day Timer system works really well if your life fits its structure. If you have regular appointments, tasks with clear deadlines, meetings to track, it’s fantastic. The physical act of writing things down helps me remember them better than digital planning.
But there are gaps. It doesn’t handle recurring tasks elegantly – you’re writing the same thing over and over. Project management isn’t its strong suit unless you add a bunch of extra inserts. And if you’re collaborating with other people who use digital calendars, you’re gonna be doing double entry (writing it in your Day Timer and putting it in Google Calendar so others can see it).
I use my Day Timer for personal task tracking and daily scheduling. I use digital tools for shared calendars and project management with my team. It’s a hybrid system and that works for me.
The Morning Review Habit
The system really only works if you check it consistently. I spend about ten minutes every morning reviewing today’s page, checking upcoming commitments on the monthly calendar, and adjusting priorities based on what’s actually realistic to accomplish.
Without that morning review, the whole thing falls apart and you’re just carrying around a fancy notebook you don’t look at.
Refill Costs and Long-Term Reality
This is the part that surprised me – refills add up. A pack of daily pages for three months costs around $25-30. So you’re spending roughly $100-120 per year just on the daily pages, plus another $20-30 for monthly calendars and miscellaneous inserts.
Compare that to a $15 paper planner from Target that lasts a full year, and the Day Timer system is significantly more expensive. But the customization is worth it for me because I can adjust the format as my needs change. With a bound planner, you’re stuck with whatever layout they printed.
If you’re trying to decide whether to invest in this system, honestly think about whether you’ll use it for at least a year. The startup cost plus refills means you need to commit to make it worthwhile.
Which One Should You Actually Buy
If you’re starting from scratch, here’s what I’d recommend: Get the desk size vinyl binder with 1.25 inch rings. Start with the one-page-per-day refill format. Add a storage pouch and a pack of monthly calendars.
That setup costs around $60-70 total and gives you everything you need to test whether the system works for you. If after a month you’re using it consistently, then consider upgrading to leather or trying different page formats.
Don’t buy the expensive leather binder and a bunch of specialized inserts right away. I see people do this, get overwhelmed by all the options, and then abandon the whole system. Start simple, add complexity only if you need it.
The two-page-per-day format is overkill for most people unless you’re an executive with back-to-back meetings all day. The weekly format is too high-level unless you have very few appointments. One page per day hits the sweet spot for most work styles.

