Digital Productivity, Online planners, Planners
Free Excel Event Planning Template: Downloads & Guide
Mar
Okay so I just spent like three hours yesterday setting up event planning templates for a client’s workshop series and honestly the free Excel ones are actually pretty solid if you know which ones to grab and how to tweak them.
The main thing is that most free templates are either way too complicated with formulas you’ll never use or they’re so basic they’re basically just a blank spreadsheet with fancy headers. Neither is helpful when you’re actually trying to plan something and it’s 2am and you’re panicking about vendor confirmments.
The Templates That Actually Work
I’ve tested probably fifteen different free Excel event planning templates over the past year because my productivity coaching clients always ask about this stuff. The Microsoft Office template library has this one called “Event Planning Tracker” that’s genuinely useful – it’s got budget tracking, task lists, vendor contacts, and a timeline all in different tabs. You can download it straight from Excel if you go to File > New and search “event planning” but honestly their search is terrible so sometimes I just Google “Microsoft event planning template” and download from their website.
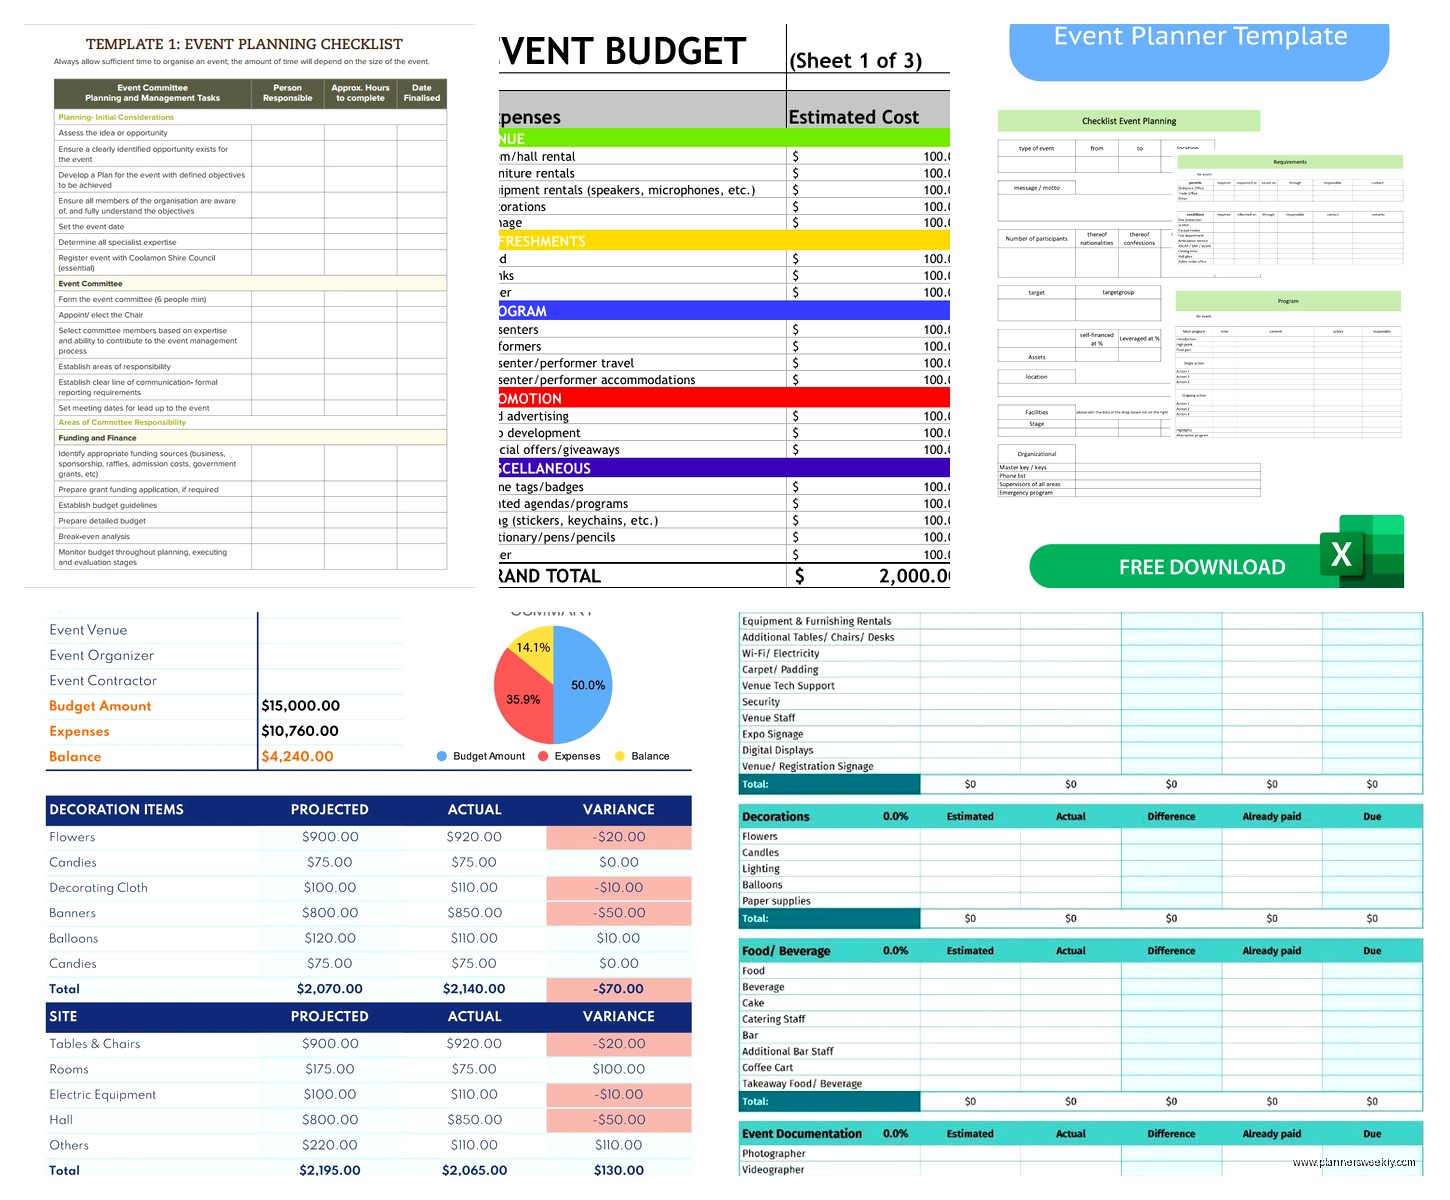
The template I actually use most though is from Vertex42. They have this event budget template that breaks down costs by category and shows you real-time how much you’re over or under budget. Which is crucial because I cannot tell you how many times I’ve planned something and suddenly realized I spent the entire catering budget on decorations because I wasn’t tracking properly.
Setting Up Your First Template
When you download any of these templates, first thing you gotta do is save it with a new name obviously. I usually do something like “EventName_Planning_2024” because I learned the hard way that “Copy of Event Template (2) FINAL” is not a searchable file name when you need to find it six months later.
Open it up and just delete any sample data they’ve included. This sounds obvious but I’ve seen people try to work around the fake vendor names and sample budgets and it gets messy fast. Just select those rows and delete them.
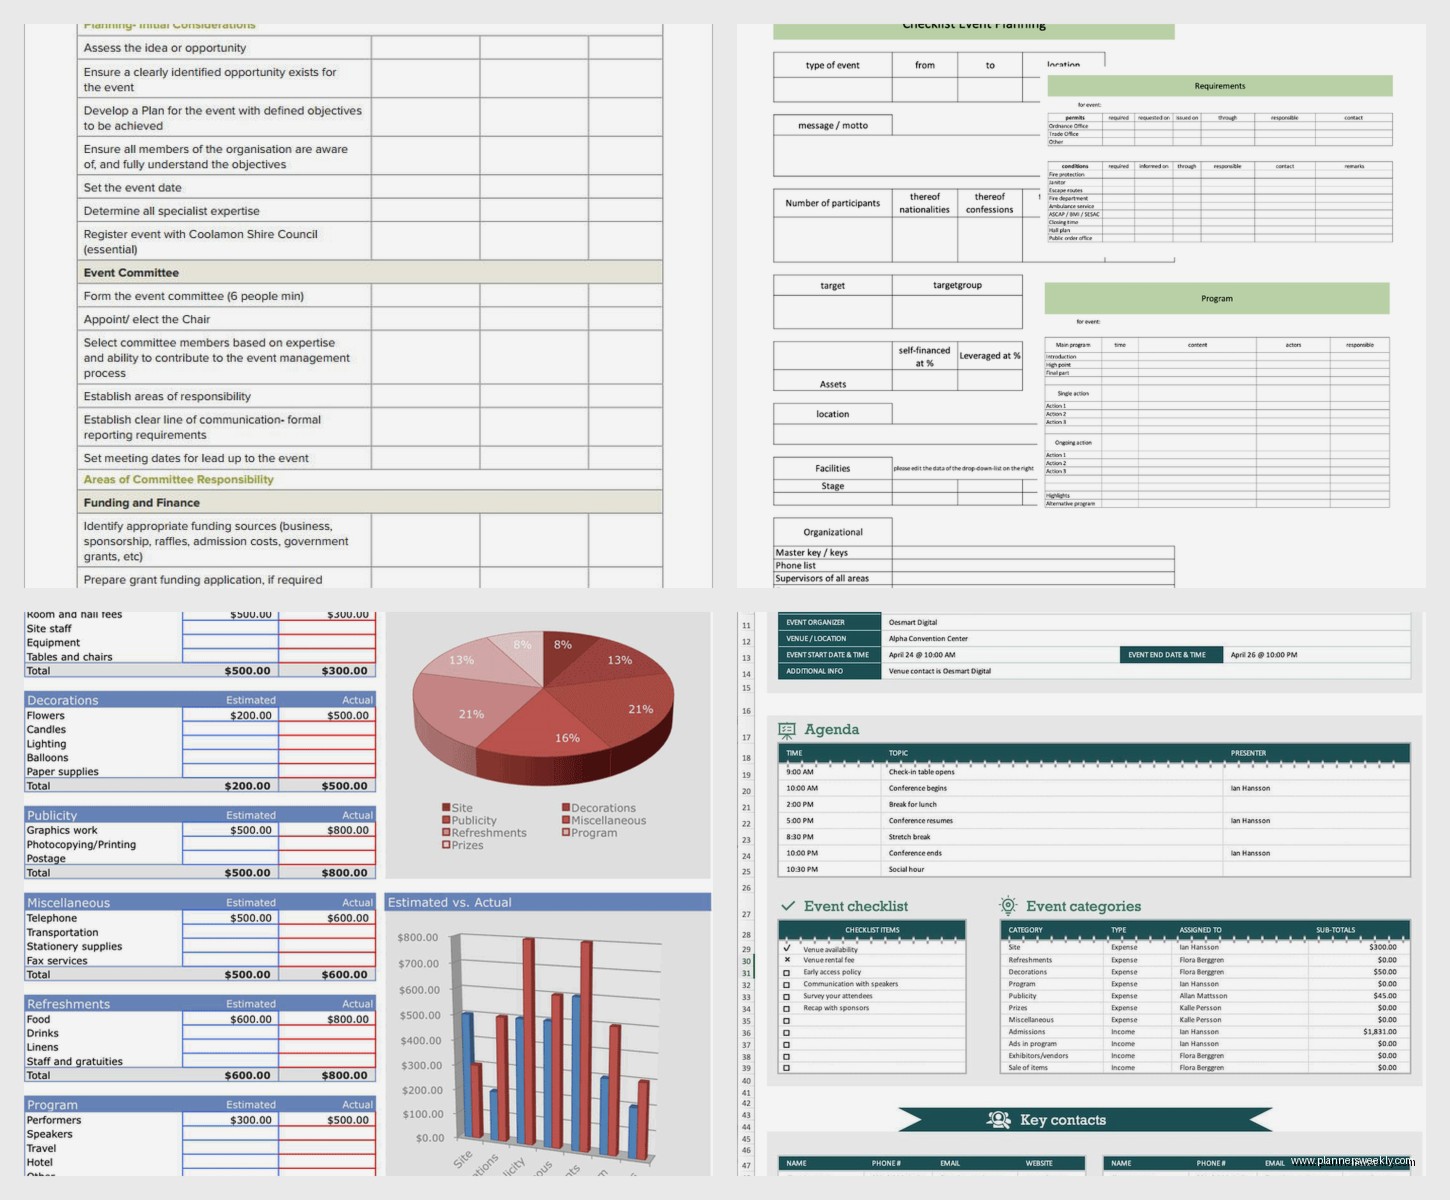
Most templates have these sections:
- Budget tracker with categories
- Task list with deadlines and assignments
- Vendor contact information
- Guest list or attendee tracking
- Timeline or schedule
You might not need all of them depending on your event. Like if you’re planning a small team meeting you probably don’t need a complex vendor tracking system.
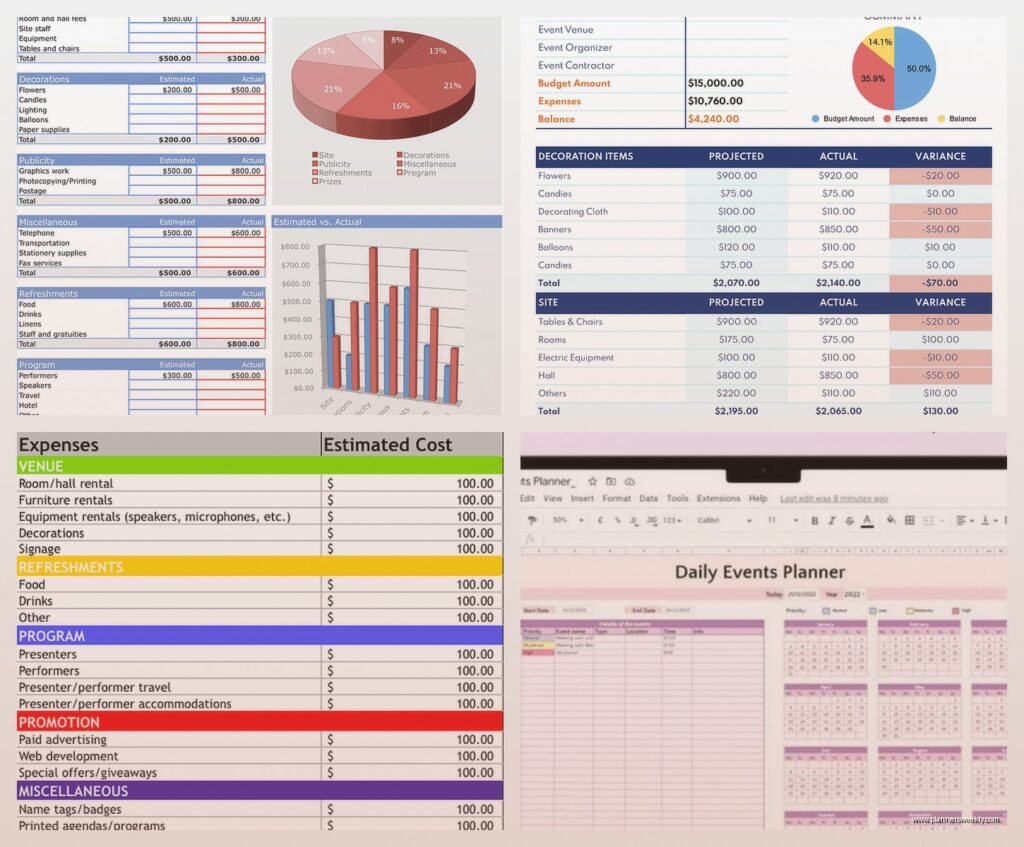
Budget Section Is Where You Start
Always fill out the budget section first even if you don’t have final numbers. Use estimates. The whole point is to see if your vision is even financially possible before you start booking things and getting excited.
I had this client last month who wanted to plan this elaborate product launch and she’d already mentally committed to this venue before we sat down with the budget template. Turned out the venue alone was like 60% of her total budget and she hadn’t even thought about AV equipment or catering or marketing materials. We ended up finding a different space but if she’d booked that first venue she would’ve been stuck.
The Vertex42 template has this nice feature where you can set your total budget at the top and it calculates your remaining balance automatically as you add expenses. It’ll turn red if you go over which is both helpful and slightly stressful to look at.
Categories I always include:
- Venue rental
- Catering and beverages
- Equipment rental (AV, furniture, whatever)
- Decorations and supplies
- Entertainment or speakers
- Marketing and printing
- Staff or contractor fees
- Miscellaneous (always budget like 10% here for random stuff)
Oh and another thing – add a column for “actual cost” next to “estimated cost” because prices are never exactly what vendors quote you initially. My dog just knocked over my coffee while I’m writing this so if this gets rambly that’s why.
Task List Setup
The task section is where these templates either shine or completely fail. The good ones let you assign tasks to people, set deadlines, mark priority levels, and track completion status.
I usually set up my task list working backwards from the event date. So if your event is June 15th, you start there and work backwards. Like:
- Day of event: final setup, vendor arrivals, guest check-in
- Week before: confirm all vendors, finalize seating, print materials
- Two weeks before: send final reminders, confirm headcount, do site visit
- One month before: finalize menu, confirm entertainment, order supplies
And so on. I go back usually about 3-4 months for bigger events because vendor booking can take forever.
Wait I forgot to mention – add a “notes” column to your task list. You’ll want somewhere to jot down random details like “caterer said they need access to kitchen by 2pm” or “venue contact prefers email not phone calls.” These little details matter when you’re actually executing.
Customizing For Different Event Types
Corporate events need different tracking than weddings or birthday parties obviously. For corporate stuff I add columns for:
- Approval status (because corporate events need seventeen approvals apparently)
- Invoice numbers and payment tracking
- Attendee companies and titles for name badges
- Dietary restrictions and accessibility needs
For personal events like weddings or big birthday parties you might want:
- RSVP tracking with meal choices
- Relationship to host (helps with seating charts)
- Gift registry information
- Plus-one tracking
This is gonna sound weird but I always add a “stress level” column to my task list where I rate how complicated each task is. Like confirming a venue booking is low stress – one email. Creating a seating chart for 150 people with complicated family dynamics is high stress. It helps me plan my time and energy better.
The Timeline Tab
Most templates include a timeline or schedule tab for the actual event day. This is super important but people always fill it out too vague.
Don’t just write “Setup: 8am-10am” – break it down:
- 8:00am – Venue access, meet coordinator
- 8:15am – Rental company delivers tables and chairs
- 8:30am – Start table setup
- 9:00am – AV team arrives for tech setup
- 9:30am – Catering team arrives, kitchen access
- 10:00am – Florist delivers centerpieces
Specific times for specific things. Because on event day your brain will be mush and you need to just follow the schedule without thinking.
I learned this the hard way at a workshop I planned where I just had “morning setup” on my timeline and three different vendors showed up at the same time needing the same loading dock and it was chaos. Now I stagger everything with 15-30 minute buffers between arrivals.
Vendor Contact Management
The vendor section should have way more than just names and phone numbers. I include:
- Company name and contact person
- Phone, email, and emergency contact
- What they’re providing specifically
- Contract date and payment terms
- Arrival time and setup requirements
- Insurance and license info if needed
- Cancellation policy
Keep all your vendor contracts in one folder (I use Dropbox but whatever) and put the folder link in your Excel template. Then you can click through to find contracts quickly.
Also I always get vendor emergency contacts if possible. Like the catering company’s after-hours number or the AV person’s cell phone. Because something will definitely go wrong and it’ll definitely be outside business hours.
Guest List and RSVP Tracking
If your event has invited guests, the tracking template needs to be detailed. Basic columns:
- Full name
- Email and phone
- Invitation sent date
- RSVP status (yes/no/maybe/no response)
- Number of guests (if plus-ones allowed)
- Meal preference
- Special requirements
I use conditional formatting to color-code RSVP status – green for confirmed, red for declined, yellow for pending. Makes it super easy to see at a glance how many people you’re waiting on.
Oh and another thing – add an “invited by” column if you’re planning something with multiple hosts or stakeholders. Really helpful for tracking down non-responders because you can ask the person who invited them to follow up.
Formulas That Actually Help
You don’t need to be an Excel expert but a few basic formulas make these templates way more useful.
For budget tracking use SUM formulas to total each category and your overall budget. Most templates have these already but if you add categories you’ll need to update the formula range.
COUNT or COUNTA formulas are great for guest lists – count how many confirmed attendees you have versus invited. Formula looks like: =COUNTIF(D2:D100,”Yes”) if your RSVP column is D.
I also use conditional formatting rules to highlight upcoming deadlines. Like if a task deadline is within 7 days, turn that row yellow. Within 3 days, turn it orange. Past due, red. Keeps you on top of stuff without having to manually review every task.
The percentage complete formula is useful too – count how many tasks are marked complete divided by total tasks. Gives you a progress indicator. Though honestly sometimes seeing you’re only 23% done two weeks before the event is more stressful than helpful.
Common Mistakes People Make
Biggest mistake is downloading a template and then never updating it. These templates only work if you actually use them consistently. I tell clients to set aside 30 minutes twice a week to update everything – mark completed tasks, add new expenses, follow up on pending RSVPs.
Second mistake is trying to track too much detail. You don’t need to document every single tiny decision. Just the important stuff that affects budget, timeline, or other people’s responsibilities.
Also people forget to share the template with their team or co-planners. If you’re collaborating, either share the Excel file through OneDrive/Google Drive or convert it to Google Sheets. Don’t email versions back and forth because you’ll end up with like eight different versions and no idea which one is current.
I watched this show about event planning disasters last week while testing templates and honestly most of the disasters came down to poor communication and tracking. Which a good template actually prevents if you use it properly.
When to Skip Excel and Use Something Else
Excel is great for small to medium events where you’re the main planner or working with just a couple people. But if you’re planning something really large or complex with a big team, you might need actual project management software.
I’ve had clients try to use Excel for 500+ person conferences and it gets unwieldy. Too many moving parts, too many people needing access, too much real-time coordination needed.
Also if you need guest-facing features like online RSVP forms or ticketing, Excel won’t do that. You’d need to pair it with something like Google Forms or Eventbrite.
But for like 90% of regular events – team meetings, workshops, small conferences, parties, weddings under 200 people – a well-set-up Excel template is totally sufficient and free which is the best part.
Backing Up Your Planning File
Save your template file in multiple places. I keep mine in Dropbox so it auto-syncs, but I also email myself a copy every week or so. And before the event I print a copy of the key pages – budget, timeline, vendor contacts, task list.
Because technology fails at the worst possible moments. I’ve been at events where my laptop died or I couldn’t get wifi and having printed backup info saved me multiple times.
Also version control matters – when you make major updates, save it as a new version with the date in the filename. Like “Wedding_Planning_2024_updated_March15.xlsx” so you can go back if you need to.
The week before your event, print everything and put it in a binder. Sounds old school but having physical copies of your timeline, vendor contacts, and floor plans is clutch when you’re running around on event day and can’t stop to open your laptop.